Monday, June 29, 2015
Deploying multiple Windows VM's from template (powerCLI)
Unlike this post, which talks about deploying Linux VM's, this one is about deploying Windows VM's which is a little different.
Your PowerCLI command will look like this:
Import-Csv "C:\boaz\NewVMs-LA01.csv" -UseCulture | %{
## Gets Customization info to set NIC to Static and assign static IP address
Get-OSCustomizationSpec $_.Customization | Get-OSCustomizationNicMapping | `
## Sets the Static IP info
Set-OSCustomizationNicMapping -IpMode UseStaticIP -IpAddress $_."IPAddress" `
-SubnetMask $_.Subnetmask -DefaultGateway $_.DefaultGateway -Dns $_.DNS1,$_.DNS2
## Sets the name of the VMs OS
$cust = Get-OSCustomizationSpec -name Windows2008R2_profile
Set-OSCustomizationSpec -OSCustomizationSpec $cust -NamingScheme Fixed -NamingPrefix $_.VMName
## Creates the New VM from the template
$vm=New-VM -name $_."VMName" -Template $_.Template -Host $_."VMHost" `
-Datastore $_.Datastore -OSCustomizationSpec $_.Customization `
-Confirm:$false -RunAsync
}
You will of course need to create a customization profile for this Windows Server, in which you can put all the relevant information, including a Domain membership, license key (If you're not using a KMS server) and others.
Your CSV file looks like this below in this example: (click on it to see bigger)
You can download this CSV from here
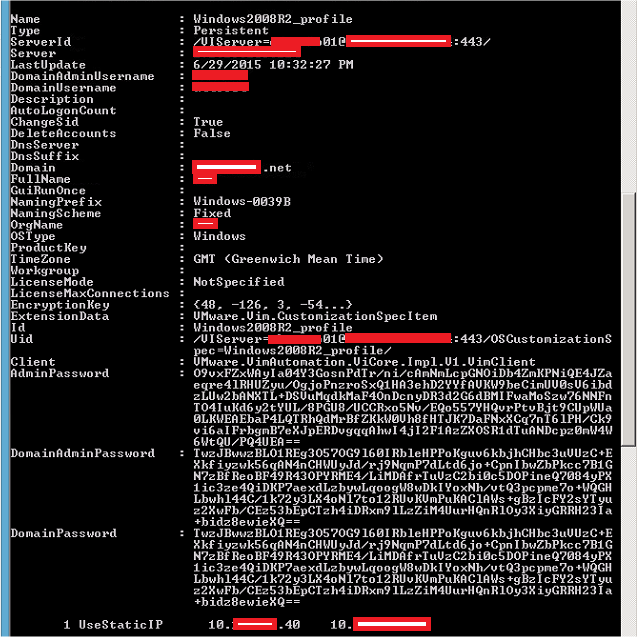
Your PowerCLI unlike Linux will look like this:(sorry for the red patches, had to remove identifying information)
Thursday, June 11, 2015
Adding a Stand Alone ESXi host to Active Directory Authentication
If you're not using vCenter, or even if you are and your hosts aren't in lockdown mode, you may want to have authentication to the local ESXi hosts done through Active Directory.
These are the steps:
Pre-requisits:
Since you are adding to the domain, you need a name server to be able to resolve the Active Directoy domain controller or server that hosts the Master FSMO Role.
_ldap._tcp.dc._msdcs. DNSDomainName SRV resource record, which identifies the name of the domain controller that hosts the Active Directory domain.
Go to DNS and Routing, and put the hostname,, domain (as it shows in AD) and the IP of the DNS server that can answer for the SRV Record for the domain.
1. Go to Configuration --> Authentication Services, and then to Properties.
2. Choose "Active Directory" from the pull-down menu, and then put in your domain name, and click "Join Domain" it will then prompt you to put in credentials of a user that can add computers to the domain.
IMPORTANT: Wait until this finishes, look for an event saying that it's "Join Windows domain" and wait for it to complete: See pic below, don't continue until this is done.
These are the steps:
Pre-requisits:
Since you are adding to the domain, you need a name server to be able to resolve the Active Directoy domain controller or server that hosts the Master FSMO Role.
_ldap._tcp.dc._msdcs. DNSDomainName SRV resource record, which identifies the name of the domain controller that hosts the Active Directory domain.
Go to DNS and Routing, and put the hostname,, domain (as it shows in AD) and the IP of the DNS server that can answer for the SRV Record for the domain.
1. Go to Configuration --> Authentication Services, and then to Properties.
2. Choose "Active Directory" from the pull-down menu, and then put in your domain name, and click "Join Domain" it will then prompt you to put in credentials of a user that can add computers to the domain.
3. Go to Configuration --> Advanced Services and to Config, and scroll down to Config.HostAgent.plugins.hostsvc.esxAdminsGroup and add an Active Directory group that you want to be Administrators on this box.
4. SSH into the box, create a directory /var/lock/subsys, then restart the following services as such:
~ # mkdir /var/lock/subsys
~ # /etc/init.d/netlogond restart; /etc/init.d/lwiod restart; /etc/init.d/lsassd restart;
5. Now you should see the domain you added when you go to add a permission, as well as any trusts if you have that configured.
That's it. You can now login into this ESXi with your domain\username and your AD password.
However root/password will still work, so you may want to put a different password so no one that knew root before will access the ESXi host.
Subscribe to:
Posts (Atom)


