Tuesday, July 7, 2015

Add Multiple Hosts to vCenter and other PowerCLI snippets

Once in a while you may need to add a whole chassis of 16 blades, or even 5 chassis's to vCenter, and I'm pretty sure you don't want to do it manually 90 times....

So here it goes:

1.  Make a file, call it vcenter-hosts.txt or whatever you want, and put it in c:\temp, put all your hosts that you want to enter.  Mine looks like this:

vmhost-la01-ch01-bl01.dvirt.net
vmhost-la01-ch01-bl02.dvirt.net
vmhost-la01-ch01-bl03.dvirt.net
vmhost-la01-ch01-bl04.dvirt.net

2.  Connect via PowerCLI to your vCenter and issue this command:

Get-Content c:\temp\vcenter-hosts.txt | Foreach-Object { Add-VMHost $_ -Location (Get-Datacenter LosAngeles01) -User root -Password changeme-RunAsync -force:$true}

You will see this:


On the vCenter it will look like this:


That's it.

Of course your hosts need to be resolved by the vCenter, or you will get a nice error like this:

Add-VMHost : 6/22/2015 8:23:45 PM    Add-VMHost        Cannot contact the
specified host (host01.blah.net). The host may not be available on
the network, a network configuration problem may exist, or the management
services on this host may not be responding.
At line:1 char:45


After you add all these hosts, you may want to use Ansible to configure them all, or if you rather, you can do some stuff such as set hostname and DNS and others via command line such as below:

Set ESXi hostname via Command line (SSH directly to the host)
esxcli system hostname set --host=esxi08.abcdomain.net

Set ESXi search domains: (SSH directly to the host)
esxcli network ip dns search add  -d yahoo.com domain.local

Set up nameserver/s: (SSH directly to the host)
esxcli network ip dns server add  -s 4.2.2.2


Another issue that may come up (especially if you use Ansible) is that you want to name all your datastores the same thing, if they are not, or you want to name them a good name, this would be the command in PowerCLI:

get-vmhost esxi08.abcdomain.net |  get-datastore | set-datastore -name esxi08-local

It would look like this:


However you need to do this when the host is NOT in vCenter.  When you import say 16 hosts into vCenter, the first one will have its datastore called "datastore1" then the next one will be datastore1 (1) and the one after that datastore1 (2) and so on.  example:


So in order for ansible to work, when it's expecting datastore1, you need to rename the datastore to that (or just leave it if you didnt bring it into vCenter) Once you remove it from vCenter, the name remains, but then you can use the command above to change it back or change it to whatever name you want.


Monday, June 29, 2015

Deploying multiple Windows VM's from template (powerCLI)


Unlike this post, which talks about deploying Linux VM's, this one is about deploying Windows VM's which is a little different.

Your PowerCLI command will look like this:

Import-Csv "C:\boaz\NewVMs-LA01.csv" -UseCulture | %{
## Gets Customization info to set NIC to Static and assign static IP address
    Get-OSCustomizationSpec $_.Customization | Get-OSCustomizationNicMapping | `
## Sets the Static IP info
    Set-OSCustomizationNicMapping -IpMode UseStaticIP -IpAddress $_."IPAddress" `
        -SubnetMask $_.Subnetmask -DefaultGateway $_.DefaultGateway -Dns $_.DNS1,$_.DNS2
## Sets the name of the VMs OS 
    $cust = Get-OSCustomizationSpec -name Windows2008R2_profile 
    Set-OSCustomizationSpec -OSCustomizationSpec $cust -NamingScheme Fixed -NamingPrefix $_.VMName
## Creates the New VM from the template
    $vm=New-VM -name  $_."VMName" -Template $_.Template -Host $_."VMHost" `
        -Datastore $_.Datastore -OSCustomizationSpec $_.Customization `
        -Confirm:$false -RunAsync
}

You will of course need to create a customization profile for this Windows Server, in which you can put all the relevant information, including a Domain membership, license key (If you're not using a KMS server) and others.

Your CSV file looks like this below in this example: (click on it to see bigger)


You can download this CSV from here

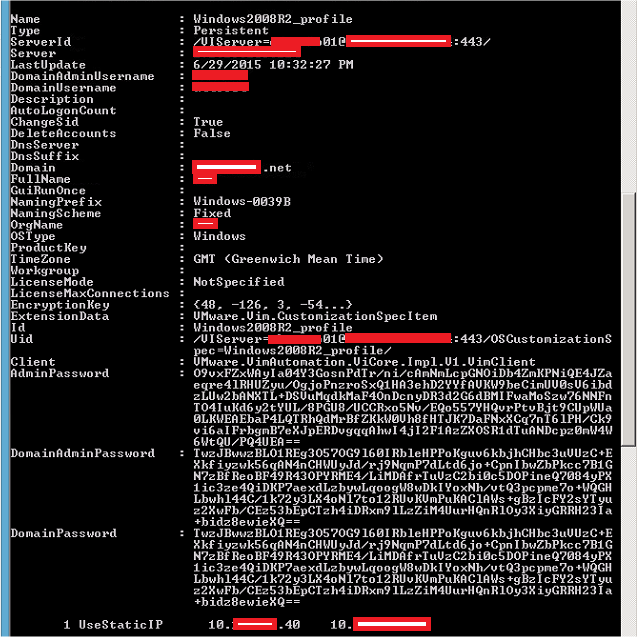
Your PowerCLI unlike Linux will look like this:(sorry for the red patches, had to remove identifying information)


Thursday, June 11, 2015

Adding a Stand Alone ESXi host to Active Directory Authentication

If you're not using vCenter, or even if you are and your hosts aren't in lockdown mode, you may want to have authentication to the local ESXi hosts done through Active Directory.

These are the steps:

Pre-requisits:

Since you are adding to the domain, you need a name server to be able to resolve the Active Directoy domain controller or server that hosts the Master FSMO Role.
_ldap._tcp.dc._msdcs. DNSDomainName SRV resource record, which identifies the name of the domain controller that hosts the Active Directory domain. 

Go to DNS and Routing, and put the hostname,, domain (as it shows in AD) and the IP of the DNS server that can answer for the SRV Record for the domain. 


1.  Go to Configuration --> Authentication Services, and then to Properties.


2. Choose "Active Directory" from the pull-down menu, and then put in your domain name, and click "Join Domain"  it will then prompt you to put in credentials of a user that can add computers to the domain.


IMPORTANT:  Wait until this finishes, look for an event saying that it's "Join Windows domain" and wait for it to complete: See pic below, don't continue until this is done.


3.  Go to Configuration --> Advanced Services and to Config, and scroll down to Config.HostAgent.plugins.hostsvc.esxAdminsGroup and add an Active Directory group that you want to be Administrators on this box.  


4.  SSH into the box, create a directory /var/lock/subsys, then restart the following services as such:

~ # mkdir /var/lock/subsys
~ # /etc/init.d/netlogond restart; /etc/init.d/lwiod restart; /etc/init.d/lsassd restart;


5.  Now you should see the domain you added when you go to add a permission, as well as any trusts if you have that configured.


That's it.  You can now login into this ESXi with your domain\username and your AD password.  
However root/password will still work, so you may want to put a different password so no one that knew root before will access the ESXi host.


Friday, March 13, 2015

How to go into Single User mode when Password is needed in RedHat

How to go into Single User mode when Password is requested in RedHat


Sometimes you don't have the password when P2V'ing or just lost password, and adding a "Single" at the end of the kernel line doesn't work, and it still gives you a screen like this:


If you press Control-D, then the system just continues boot.

This is how you get past it:


Single User Mode when asked for root password for maintenance


1. Go to the VM Console (or Physcal Server console)
2. Reboot your machine; press 'Esc' repeatedly until you get to the GRUB menu; you will get something like this:


3. Press Enter, and select the kernel line (#2) 


3. press 'e' to edit; Edit the line to get rid of quiet and splash; change 'ro' to 'rw'; and add 'init=/bin/bash'. The line should look something like this:

grub edit> kernel /vmlinuz-2.6.32-220.el6.x86_64 root=/dev/mapper/vg_root-lv_root rw init=/bin/bash


Then press "Enter" and then "B" (to boot)  then it will give you a root prompt:


And that's it.  Of course you could also boot from a ISO file or a DVD, then mount the filesystem and change the password or whatever else you need to do, but this is quicker.

Tuesday, February 24, 2015

Converting Physical Servers to VM's and getting the "Unable to query the live linux source machine" error

The famous "Unable to query the live linux source machine" error.  

So you could be trying to convert a physical box that has interfaces that look like this:

[root@linux01 ~]# ifconfig 
eth0      Link encap:Ethernet  HWaddr 78:2B:CB:11:71:B4  
          inet6 addr: fe80::7a2b:cbff:fe11:71b4/64 Scope:Link
          UP BROADCAST RUNNING MULTICAST  MTU:1500  Metric:1
          RX packets:571643146 errors:0 dropped:0 overruns:0 frame:0
          TX packets:260652914 errors:0 dropped:0 overruns:0 carrier:0
          collisions:0 txqueuelen:1000 
          RX bytes:734439978 (700.4 MiB)  TX bytes:679368267 (647.8 MiB)
          Interrupt:90 Memory:da000000-da012800 

eth0.28  Link encap:Ethernet  HWaddr 78:2B:CB:11:71:B4  
          inet addr:10.28.0.2  Bcast:10.225.255.255  Mask:255.255.0.0
          inet6 addr: fe80::7a2b:cbff:fe11:71b4/64 Scope:Link
          UP BROADCAST RUNNING MULTICAST  MTU:1500  Metric:1
          RX packets:493616754 errors:0 dropped:0 overruns:0 frame:0
          TX packets:260652917 errors:0 dropped:0 overruns:0 carrier:0
          collisions:0 txqueuelen:0 
          RX bytes:1212214321 (1.1 GiB)  TX bytes:2853259219 (2.6 GiB)

eth1      Link encap:Ethernet  HWaddr 78:2B:CB:11:71:B5  
          inet addr:10.23.1.2  Bcast:10.233.255.255  Mask:255.255.0.0
          inet6 addr: fe80::7a2b:cbff:fe11:71b5/64 Scope:Link
          UP BROADCAST RUNNING MULTICAST  MTU:1500  Metric:1
          RX packets:91354729 errors:0 dropped:0 overruns:0 frame:0
          TX packets:55239822 errors:0 dropped:0 overruns:0 carrier:0
          collisions:0 txqueuelen:1000 
          RX bytes:311977801 (297.5 MiB)  TX bytes:4190442061 (3.9 GiB)
          Interrupt:98 Memory:dc000000-dc012800 

lo        Link encap:Local Loopback  
          inet addr:127.0.0.1  Mask:255.0.0.0
          inet6 addr: ::1/128 Scope:Host
          UP LOOPBACK RUNNING  MTU:16436  Metric:1
          RX packets:102371 errors:0 dropped:0 overruns:0 frame:0
          TX packets:102371 errors:0 dropped:0 overruns:0 carrier:0
          collisions:0 txqueuelen:0 
          RX bytes:109111704 (104.0 MiB)  TX bytes:109111704 (104.0 MiB)


Problem is, when you try to convert them using the VMware Converter, you will  get this error:

"unable to query the live linux source machine"

unable to query the live linux source machine
In the example here it's RedHat but the concept works on many flavors.

Due to a programming issue in the VMware converter, the converter gets confused with this dot (.) in the interface name, and bombs out.  So you need to change the interface from something like ifcfg-eth0.28 to ifcfg-vlan28


Please do this using an iDRAC or iLO or console, as more likely than not, you will lose network connectivity over an SSH session....


Now to the details, you need the configuration inside the interface look like this:

VLAN=yes
VLAN_NAME_TYPE=VLAN_PLUS_VID_NO_PAD
DEVICE=vlan28
PHYSDEV=eth0
BOOTPROTO=static
ONBOOT=yes
TYPE=Ethernet
IPADDR=10.28.0.2
NETMASK=255.255.0.0

(note the VLAN_NAME_TYPE=VLAN_PLUS_VID_NO_PAD line, that's crucial, as the line in there may read VLAN_NAME_TYPE=DEV_PLUS_VID_NO_PAD and that won't work!!)

Now you need to remove the vlan that was already there, you can do it with vconfig:

#vconfig rem eth0.28
Removed VLAN -:eth0.28:-

Now issue a "service network restart" (or /etc/init.d/network restart

and you should see the new name (vlan28) in the interface list.  

You can see what vlans there are like this:

#ls /proc/net/vlan
config       vlan28

(this is after I restarted the network of course)  


[root@linux01 ~]# ifconfig 
---snip---
vlan28   Link encap:Ethernet  HWaddr 78:2B:CB:10:2B:6F  
          inet addr:10.28.0.2  Bcast:10.225.255.255  Mask:255.255.0.0
          inet6 addr: fe80::7a2b:cbff:fe10:2b6f/64 Scope:Link
          UP BROADCAST RUNNING MULTICAST  MTU:1500  Metric:1
          RX packets:26368 errors:0 dropped:0 overruns:0 frame:0
          TX packets:3701 errors:0 dropped:0 overruns:0 carrier:0
          collisions:0 txqueuelen:0 
          RX bytes:2942976 (2.8 MiB)  TX bytes:496224 (484.5 KiB)